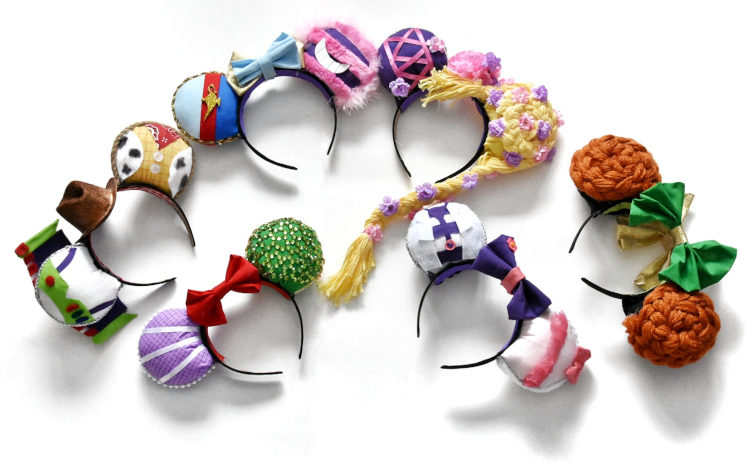
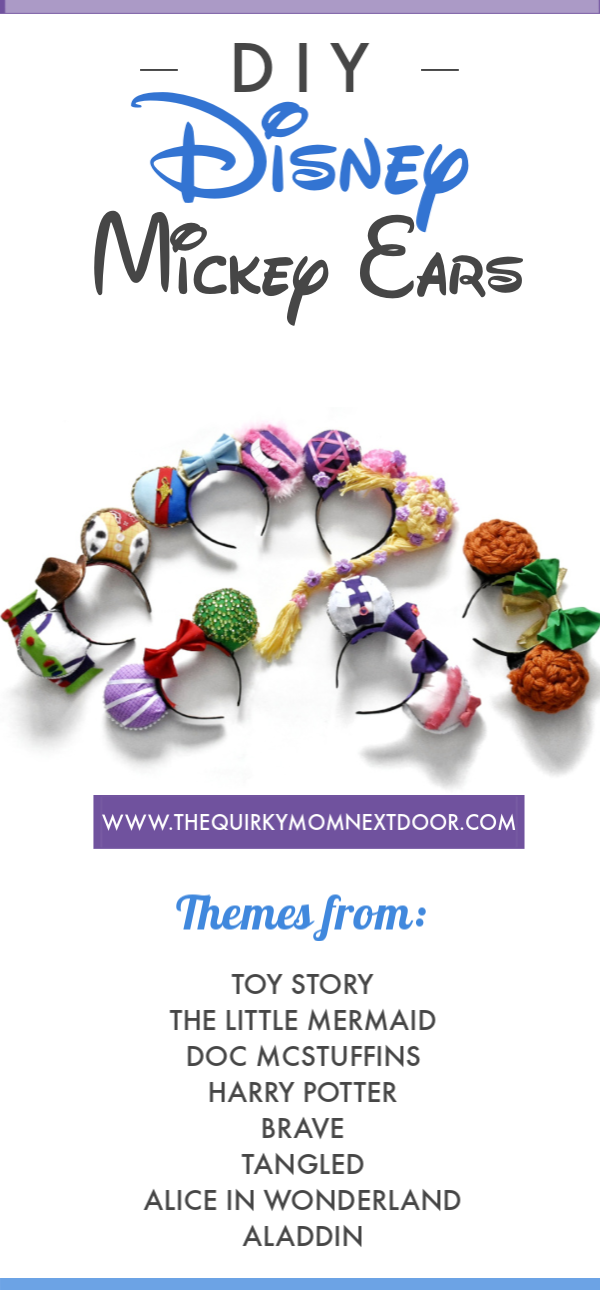
It seems like a Disney trip isn’t complete without Mickey ears. You can buy them at Disney World but I know that can get a little expensive, especially with a big gaggle of children. Plus, if you make them yourself, you have the opportunity to really get creative! I was nervous taking on the task of making seven Mickey ears with all of the kids’ favorite characters but I’m really happy with the result! (You’ll only see six for now because I’m still working on my husband’s!)
There are a bunch of different ways to make Mickey ears but I’m a huge fan of the no-sew hot glue version! I didn’t have to break out the sewing machine for any part of these ears. I’ve watched a few videos but thanks to the DIY Disney Ears Facebook group, I was able to use what I consider to be the best and most straight-forward no-sew ears tutorial to make the ears themselves. Here’s my favorite tutorial:
Her style of making the ears is very sturdy and doesn’t require much, just a lot of hot glue which is pretty inexpensive. I italicized every time you should reference back to her video for your ears and bows. For the headbands, I bought these from Amazon and didn’t cover them with fabric just because I wanted the process to go a little quicker. I used basic ribbon to line the inside because that’s what I had, but I do think that decorative lacey trim ribbon would look better.
For anything involving cut-out shapes, remember that you can find just about any image just through a Google search and input them into PicSvg.com to have them turned into SVGs for a Cricut.
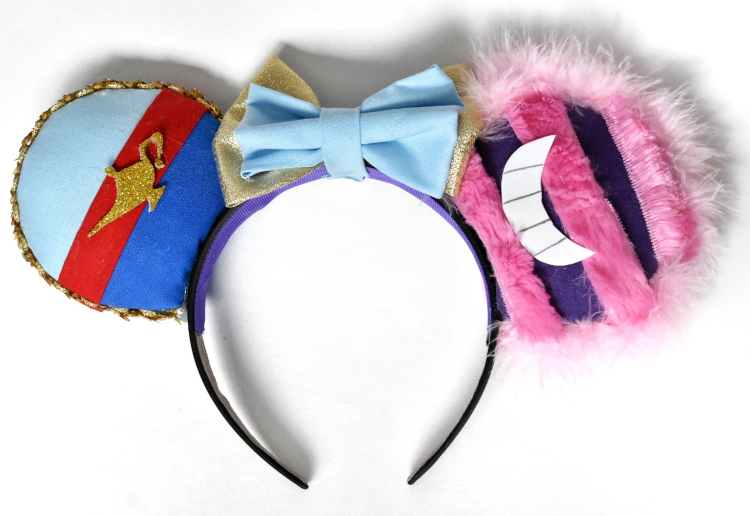
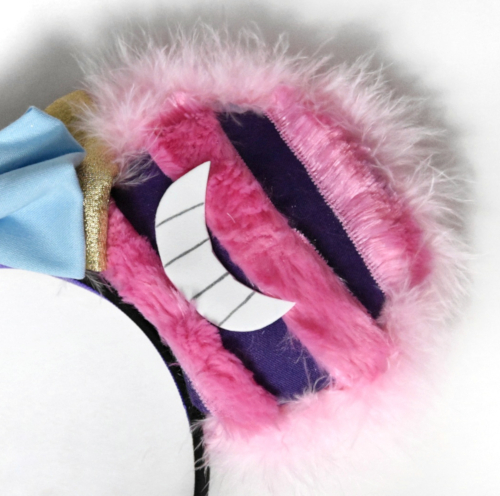
Cheshire Cat
1. Start with a basic purple fabric for the ears.
2. Using strips of fuzzy minky fabric, glue a few stripes on the ear.
4. Put the two sides of the ear together as in the tutorial video.
5. To line the edge of the ear, use a pink fuzzy boa.
6. For that big Cheshire Cat smile, cut a small piece of foam into a crescent shape and draw lines for teeth.
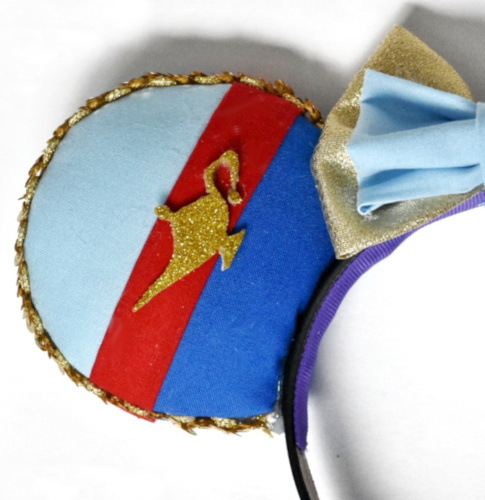
Genie from Aladdin
1. Line the ear with light blue for Genie’s skin.
2. Cut a large strip of dark blue that takes up about half of the ear. Don’t worry about uneven edges because you’ll be covering that. Pull the edges taught on the back just like you do with the main piece of fabric. All of this gets covered when you put the ear sides together.
3. Fold over a red strip of fabric and glue the edges so that it stays. It may look a bit chunky but that’s perfect because it’s meant to look like Genie’s belt.
4. Now follow the tutorial video for putting the ear sides together.
5. Use a strip of gold sequin ribbon to line the ears.
6. I used a Cricut and glitter foam to cut out a lamp shape but another option would be to use Disney Dress It Up buttons or lamp pin, charm, or even clay if you’re crafty enough! (Bow is done in similar colors using the above tutorial video’s section about fabric bows.)
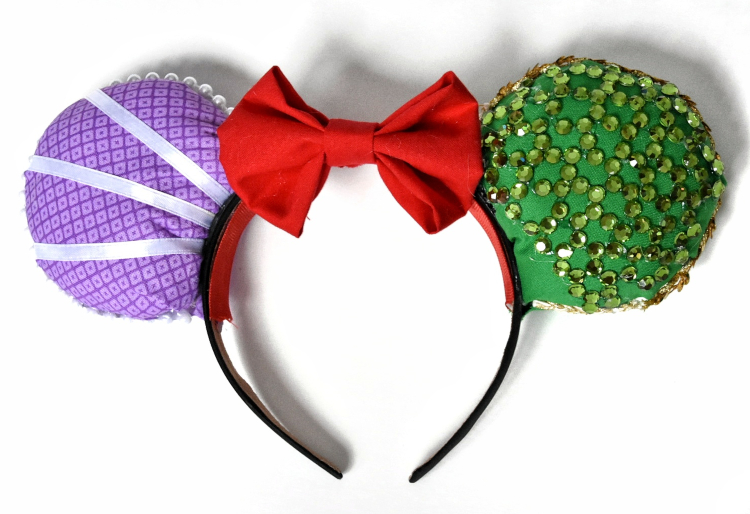
Ariel
My favorite way to do Ariel ears is to use shimmery mermaid tail fabric but I didn’t have any on hand and wanted to limit the things I was buying. I’ll share with you the alternative way that I did this:
1. Use green fabric for ear pieces.
2. Draw scales lightly with a pen and then place green rhinestones all along your scale lines.
3. Put the ears together following the tutorial video and line the edges with gold sequin ribbon.
4. For the other ear, a shell resembling Ariel’s shell top, I used a purple diamond print fabric that was leftover from the Ursula costume I made for my husband last Halloween. Solid purple would be fine too!
5. Use a thin white ribbon to create several lines in the shell. Make them taught so they create a puff at the edges of the shell. Glue down in the back, which will be covered when you put the ear pieces together.
6. Put the ear pieces together, then line the edge with a strip of white pearls! (Red bow is basic following video.)
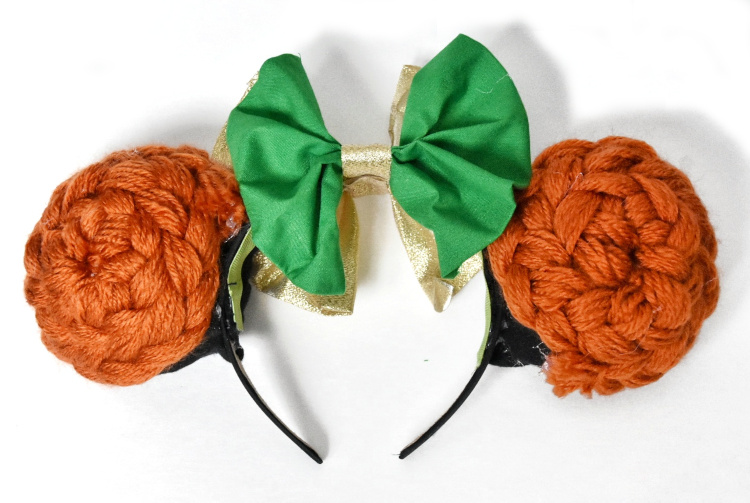
Merida
1. The only reason the color of your fabric might matter for this one is if the back matters. I made these ones reversible ears (Harry Potter on the back) so I used a black solid color to make the ears and put both ear sides together.
2. Take red-orange yarn and braid it, make sure it’s fairly long.
3. Glue the end of your braid directly in the middle of the ear and spiral the braid out so that it covers the entire ear, including the edge. Do this with both ears and if you’d like, the back as well. (Make big Merida green bow using video.)
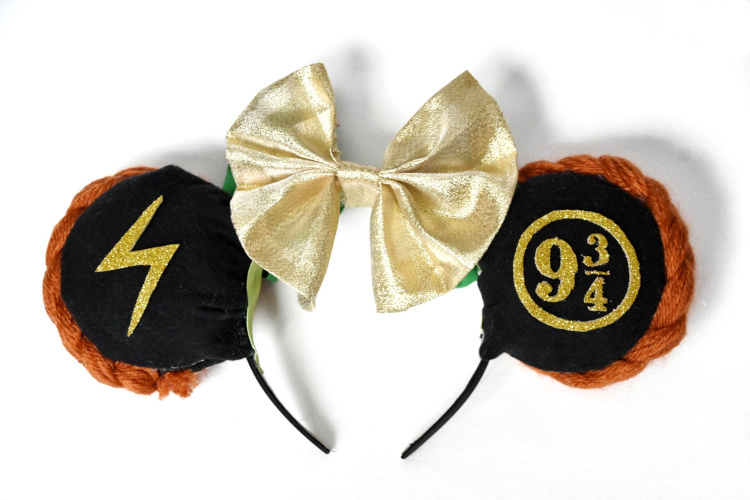
Harry Potter
After I had created the first half of the Merida ears, my daughter announced that she wanted Harry Potter on them too. I decided that a reversible ear would be possible. On the back of her already finished Merida ears, I glued glitter foam Harry Potter images that I had cut out using free images I found online. I put a gold bow using the tutorial because it would match (and be visible from) both sides.
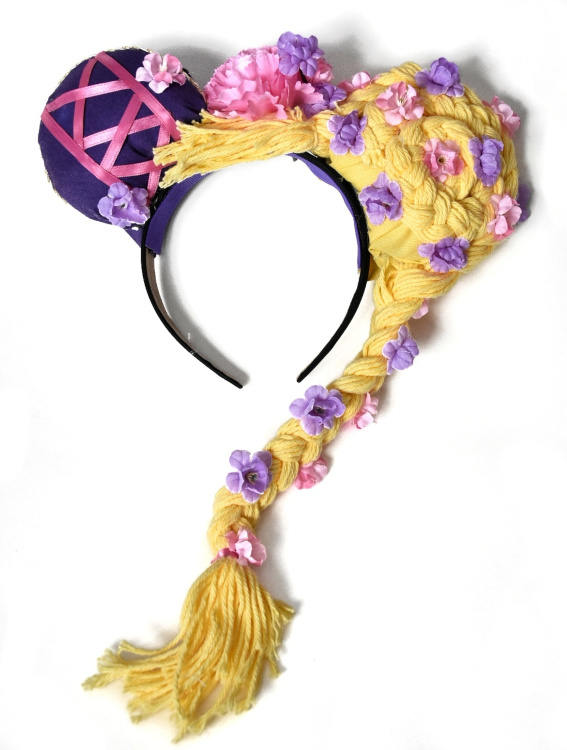
Rapunzel
1. Start with a purple solid fabric for your ears.
2. Using small pink ribbon, create a cross-laced look. I did this by crossing over several small strips and then putting two lines parallel over top of them.
3. Put the ears together and line the edges with a lacey or shimmery ribbon. I used a gold and pearly twine from the wedding section of the craft store.
4. For the other ear, after both sides are put together, get very long yellow yarn and braid it. Glue the end of one side into the middle of the ear and spiral it out.
5. Braid a second braid strand and line the edges of the ear with it, leaving a very long piece to the side of what will be the wearer’s head and a smaller, unbraided piece to look like bangs in the front.
6. Use fake flowers to decorate the hair, headband centers, and even some spots on the dress by cutting the stem almost at the edge of the flower and gluing them down one one-by-one.
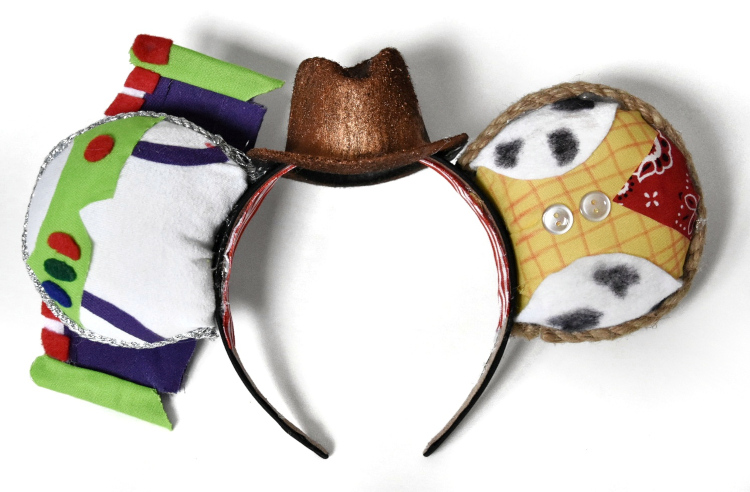
Toy Story
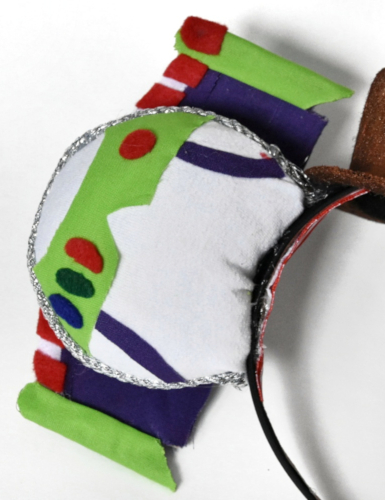
1. For Buzz, use white for the ear sides.
2. Felt is best for the details on Buzz, although fabric is still doable. Cut a light green shape for the middle of the suit, as well as three ovals for the buttons on his suit, and two thin purple strips, and one red circle. For the wings, cut a large strip of purple, two small light green strips that come to a point, and tiny red rhombuses. There are a lot of small pieces to Buzz but if you fold things over and cut, it takes a lot less time than you’d think. I looked at an actual picture of Buzz from front and back to get the accessory placing correct.
3. After all of the extras are wrapped onto each side, glue the ear sides together like in the video.
4. Line the Buzz ears with silver twine.
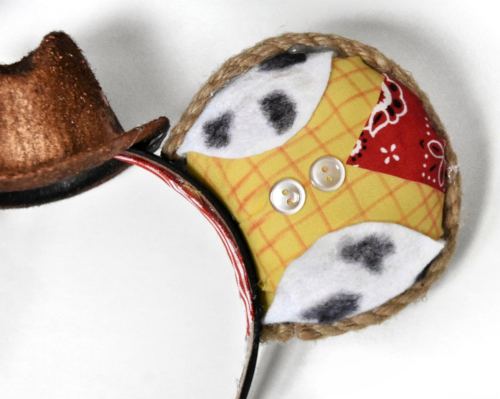
5. To make Woody, use a yellow piece of fabric and draw skinny red lines. Bonus if you can find fabric that looks this way but I hadn’t seen any!
6. Cut a small triangle of red bandanna and glue it to the top of one side of the Woody ear.
7. Put the ears together.
8. Use cow print fabric or just white felt that you’ve drawn cow print on and cut into a rounded rectangular shape to make Woody’s vest. Wrap it around the back ear side so that it looks open in the front.
9. Wrap the edges with twine.
10. Put two buttons in the middle where the vest opens.
11. Place a tiny cowboy hat in the middle of the headband! I couldn’t find a tiny cowboy hat so I found a small top hat at the craft store (intended for teddy bears, I think?) and squished the top to look more like a cowboy hat and painted it copper (because the kids used all of my brown paint!).
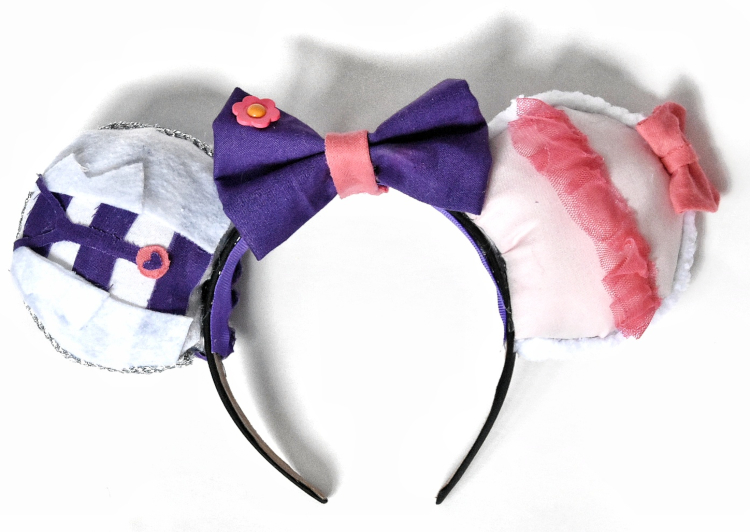
Doc McStuffins
Doc was a tough one because my toddler loves her but I had the hardest time coming up with a way to show a Doc theme similarly to the others. I decided to do Doc and her friend Lambie for these ears!

1. Start with a white solid fabric.
2. Use purple strips of fabric to create the stripes like on Doc’s shirt. Glue them in the back of the ear side since it will be covered.
3. Put the ear sides together.
4. Using a piece of white felt (for firmness), wrap Doc’s coat around the ear, leaving an opening in the front.
5. Take two small triangles and two longer ones to create the folds on a lab coat and put them at the very edge of the coat opening.
6. Make a stethoscope from purple fabric/felt, with a pink circle and heart at the bottom. Glue those over top of the coat.
7. Wrap the edge of the ear with silver twine.
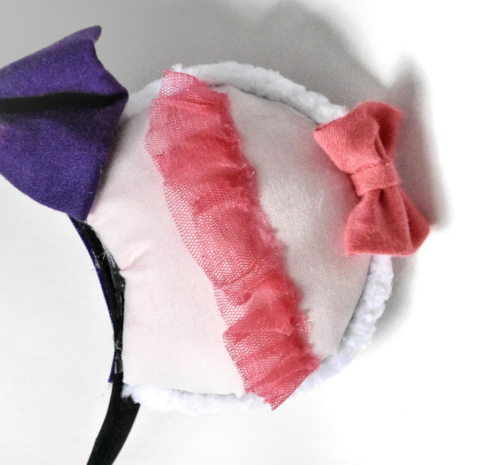
8. For the Lambie ear, start with pale pink like Lambie’s face.
9. To make Lambie’s tutu, I actually cut a pretend tutu off of a shirt we were throwing away but it’s pretty easy to use tulle to make your own little tutu or you can even ruche some pink fabric for the same look. I glued this across the center.
10. Put the ear sides together.
11. To make the edge of the ear, I used puffy blanket yarn and a simple crochet to create my own strand.
12. After the edge was glued on, I folded over a small piece of fabric and glued a little rectangle across it to make Lambie’s tiny hair bow, then glued that to the yarn.
13. For the center bow, I followed the video but using two different colors, then glued a small flower in the corner to slightly resemble Doc’s flower headband.
I tried to cover every step but if you have any questions at all, let me know!
Which character theme would your own Mickey ears have?
Follow along with our Disney journey at #QuirkyQuestforMickey or here on the blog!
*Amazon links are referral links meaning that at no cost to you, I may earn a commission if you place an order. I thank you for your support!
These ideas are adorable. I really like the Rapunzel ears!
I love the rapunzel! What a creative and fun idea!
The Disney ears video is amazing and very detailed. Is there a link to your template patterns for the ears and band? I would like to give it a try for a family Disney vacation in November.
Thanks so much
Are you able to join that Facebook group I linked? Somehow I forgot to save the free pattern I used but they link several within their group! (Free ones!)
Also, good luck and have fun!
These are adorable. I love that you even braided the yarn for the hair. I want to make Pocahontas ears. I’m going to get some of the stuff together so my Granddaughter can help me. Thanks so much for sharing. This will be so much fun.